Monday, April 16, 2018

Garden Tomato Soup

Its a cold, snowy day in mid-April and my girls are home from school for yet another snow day. This weather has us thinking about warm soup and hot sandwiches. We decided to make some tomato soup since we still have so many canned garden tomatoes on our shelf.

Tomatoes grew very well in the garden last year. We were harvesting tomatoes into November!
I researched lots of different soup recipes online and came up with a combination of ingredients that are delicious! Here's our recipe:

Ingredients:

2 quarts of canned tomatoes (ours are San Marzano tomatoes)
1 medium onion, diced (from our garden)
1 clove of chopped garlic
2 cups chicken broth (made from out broiler chickens)
3 tbsp olive oil
1/2 tbsp balsamic vinegar
1 bay leaf
1 tbsp basil
salt and pepper to taste
1/2 cup heavy whipping cream

Roux:
2 tbsp butter
2 tbsp flour

Directions:

1. Heat olive oil in a large saucepan and saute garlic and onion until soft and translucent. Season with salt and pepper.

2. Add the tomatoes and chicken stock. Stir this well and then bring to a boil. Let this boil for about 20 minutes. You want the flavors to combine and the tomatoes to soften a bit.

3. Reduce the heat and add a bay leaf, balsamic vinegar, and basil. All to simmer for a few more minutes. Meanwhile, make the roux in a separate pan.

4. Remove the bay leaf. Use a submersible blender to combine all the ingredients.

5. Add the roux to your tomato soup and whisk until well-blended.

6. Stir in the heavy cream and add additional salt and pepper to taste.

Serve and Enjoy!

The girls and I thought this tomato soup pared up nicely with a hot grilled cheese sandwich.  It was a perfect lunch for a snowy day. And it always feels great to feed my family using high quality food right from our own yard!

Grilled cheese and tomato soup - yum!

Sunday, April 15, 2018

Maple Syrup - Season Finale

2018 has been a stellar year for maple syrup production in New Hampshire. We tapped our trees early in February, and the season lasted through all of March. Mother Nature gave us the perfect sapping weather and we took full advantage of it!

Some of us find it hard to wait for finished syrup...
Grand Totals for 2018

We finished up our season with a total of 22 gallons of finished syrup! This number is huge for us. For comparison, last year we produced a total of 4 gallons. This year's production is our largest ever.

We collected 776 gallons of sap with our 39 taps. An average ratio of sap to finished syrup is 40:1. However, we were able to produce 1 gallon of syrup per 35 gallons of sap. This indicates that our sap has a higher sugar content than average.

We boiled 12 separate batches of syrup and several of these boiling sessions took multiple days to finish. Admittedly, we were tired of boiling sap by the end of the season. Boiling sap is time consuming and can be physically demanding.

To produce all of this finished syrup, we used over 2 cords of firewood, plus scrap wood. This was the first year we were able to use dried cord wood in our evaporator. Normally, we forage for dead wood around the property. We haul that wood, split it, and then burn it. This adds a huge physical burden to the boiling task and makes it hard to have long, multiple-day boils.  This year, my brother-in-law donated 2+ cords of firewood to our cause. It was so convenient to have dried cord wood ready to use in the evaporator. Going forward, we will make a bigger effort to have dried wood cut, stacked and ready for syrup season.

The Great Clean Up

Without doubt, the worst part of syrup season is the cleanup. By the end of the season, we are tired and lacking motivation to put away all of the equipment. This year, April has continued to be cold and dreary. We spent a cold, drizzly day cleaning up. This involves taking down each bucket, cleaning them, and stacking them in our garage storage space. We boil the spiels to disinfect them before storage. Next, we wash each of our 4 collection barrels. Lastly, we have to wash and clean out the evaporator. This involves descaling the pan, taking out the fire bricks, disassembling the stack, and storing all of this until next spring.

Matt improvised a bucket rack for easier cleaning.
We literally spent an entire day doing these chores. It's tiring work. We all agree that a sugar shack would be a wonderful addition to our property in order to minimize some of this work. Pipe dreams!


Bee Keeping - New Adventure!

Many people are surprised to learn that bee keeping is fairly complicated. I was one of those people! I have always thought it would be a wonderful thing to try, though I honestly had no idea what I was getting into.


To start, it is recommended that new beekeepers join a local beekeeping club and start going to "bee school." This is a 6-week program where students learn from experienced beekeepers. I spent Friday nights this past winter soaking up as much of this information as possible.

Admittedly, most of the information was overwhelming. I learned that there a many ways to kill my bees. Bees can die of bacterial infections, viruses, mites, pesticides, starvation...the list goes on.  I also learned that most likely, my bees would not make it through the harsh New Hampshire winter. In fact, there is a 60% chance that the bees will die over the winter.


Despite this harsh reality, we decided to go all in and commit to purchasing two bee colonies. Once this had been decided, we had to research which hives to buy and what equipment we needed.

Matt and I have decided to try the relatively new technology of the Flow Hive. This type of hive will allow us to harvest honey without buying all of the traditional honey extraction equipment. It also limits the stress on bees during harvest time. The inventors of this hive have had one of the most successful campaigns ever on the startup site, Indiegogo.

The Flow Hive is a bit controversial in the beekeeping world. This type of hive has made beekeeping easier and more accessible to new beekeepers, like myself. Unfortunately, not everyone understands the responsibility involved in caring for bees. Many worry that having large numbers of new beekeepers will contribute to the downfall of bees, instead of helping their numbers recover. Let's hope that we can keep our bees alive and have thriving colonies!


Friday, March 23, 2018

Maple Cream

Well I'm feeling pretty happy with my two successful attempts at making maple syrup products this year. The maple candy on a stick and the maple candy in molds were both easy, fun, and delicious.

The girls and I decided to try a recipe for maple cream, sometimes referred to as maple butter. I've eaten it once in the past, but never tried making my own.

I measured 2 cups of finished maple syrup in to a sauce pan. Then, I boiled it until the syrup reached a temperature of 235 degrees. I used a digital candy thermometer for this process and it really made the process much easier.

Once the temperature reached 235 degrees, I immediately removed the saucepan from the stove and put the entire pan in a bowl of icy, cold water. This brings the temperature down quickly.

Once the temperature reaches 100 degrees, remove it from the ice bath and start stirring it. The recipe I followed suggested using a wooden spoon. I decided to opt for a hand mixer. It still took 20 minutes of stirring. You'll know it's done when the syrup becomes lighter in color and is the consistency of peanut butter. You'll be tempted to give up, but stick with it!

My kitchen helper, Addy, took a few turns at mixing the syrup.
The finished product is delicious and can be used on pretty much anything. The maple cream will stay good in the refrigerator for a long time, since sugar is the only ingredient.

The finished product: Maple Cream

Wednesday, March 21, 2018

Maple Candy in Sugar Molds

This year I've been really excited to try making different products with our finished maple syrup. I have tried various times in the past, with little success. Historically, we haven't always produced enough syrup to justify "wasting" any on an unsuccessful recipe.

However, we have already produced 7 gallons of syrup this year and the forecast continues to look good for a long sap season. So, the girls and I decided to try making maple candy using sugar molds.


First, we boiled the finished maple syrup to a temperature of 240 degrees. I stirred it continuously while it was heating over the oven. It's best to use a sugar thermometer if you have one in order to be as accurate as possible.


Once the boiling syrup reaches 240 degrees, remove it from the heat and let it cool down to 175 degrees. Do not stir it during this time.

As soon as the syrup reaches 175 degrees, start whisking it until the syrup changes to a lighter color. This will only take a few minutes. The syrup will start to harden immediately. As quickly as possible, spoon the hot syrup into your sugar molds (or any container will work).

Let the sugar molds cool on a cooling rack until they can be removed easily from the molds. They should pop right out and be ready to eat! These make great little gifts for family, friends, and teachers!
Maple Syrup Candy - success!


Tuesday, March 13, 2018

Maple Candy on a Stick


The girls and I are avid readers of the Laura Ingalls Wilder series, "Little House on the Prairie." In the first book, we read about how those early pioneers would drip hot syrup onto cold snow and enjoy a sugary treat.  So, of course, we had to try it!

First, we had the girls (and Cousin Alice) collect snow. We had them pile the snow into a foil caserole dish, but anything with ample surface space would work.


Next, I heated a half-cup of finished maple syrup in a sauce pan until it was boiling. Then, we used a spoon to drizzle ribbons of hot syrup across the cold snow in our caserole dish.

Drizzle the hot syrup in thin ribbons on to the cold snow.
Once the hot syrup made contact with the cold snow, it started to firm up quickly. We had the girls use kabob sticks to roll the cooling sap onto the end of the stick. This wasn't really a necessary step, but it made eating much less messy.


The last and final step is to eat your maple syrup candy! The kids enjoyed this activity and the delicious outcome. The syrup had a chewy, taffy-like consistency once it cooled on the stick. 

Addy and Caitlin enjoying their maple candy.

Saturday, March 10, 2018

Maple Syrup Season Part 1

Full buckets of sap mean more syrup for us!
This spring has been great for maple syrup producers. We tapped our trees on February 15th.  This is one of the earliest starts we've had since we started making syrup 8 years ago. The weather has been perfect for good sap flow, which means we have had plenty of sap to turn into syrup!

Good Sap Conditions
Sap flows best when the nighttime temperatures drop below freezing and the daytime temperatures are in the 40's. All of this good temperature variation means that the sap is flowing and we are collecting gallons of good sap for boiling! We can leave our taps in and continue to collect it until the trees start to bud. This will happen as soon as the weather stays consistently warm. It's impossible to know how long a sap season will last. Some years, it's only a few weeks. Other years the sap season lasts for over a month.

Preparation
Before we can tap the trees, we have to clean out each of the buckets and boil each of the spiles. In addition, we have to clean out the sap collection barrels. Cleaning the buckets is tedious and time consuming. Each one needs to be scrubbed, cleaned, and rinsed. None of us enjoy washing buckets but it has to be done. This year, we cleaned all of our buckets. There were 36 in total.

Tapping the Trees
Once the conditions are right and the equipment is cleaned, it's time to tap the trees. This is always a fun day and we often get lots of family volunteers to help. Matt drills the hole and hammers in the spile. The girls hang the buckets and I place the lids on each one. It's always gratifying to hear sap dripping into a freshly hung bucket.

This year's group of volunteers!
Collecting the Sap
Once the sap starts flowing we collect the sap every day or two, as needed. We empty the sap from each bucket into a 58 gallon food-grade barrel that is strapped into the back of our Polaris Ranger. Some years, there is too much snow to drive the Ranger from tree to tree. Those years, we have to empty each bucket, one at a time. Thankfully, the snow has melted enough that we can use the Ranger to help with the work load!

Any visitors who come to our house in the Spring are subject to help collect sap!

Once the collection barrel is full, it's time to boil sap and make some syrup! I'll detail that process in a future blog post!


Wednesday, March 7, 2018

Signs of Spring

Finally, it's time to tap the trees!
Spring felt like it came a bit early this year and there are no complaints here! We had a glorious stretch of warm weather in February and it got us all excited to be outside again. It's always encouraging after a long winter to start to see signs of spring approaching.

Chickens
It's a sure sign that spring is coming when our chickens finally start laying eggs again. We averaged 4 per day throughout the winter. This is pretty depressing when you consider that we have 23 laying hens. So, it's always exciting when the egg basket starts to fill up again. The girls get very excited every evening to give us the daily tally of eggs that have been collected. We are getting 12-15 every day now.

Our flock of chickens have started laying again!
Warm weather also means that the chicken coop has thawed out enough to finally clean it out. The girls are always happy when their home has fresh pine shavings!

A spring thaw allows for a coop clean-out.

Maple Syrup
Once the daily temperatures start to be above freezing, while the nighttime temperature stay below freezing, it's the perfect time to tap our Sugar Maple Trees. We have a modest number of Sugar Maple Trees on our property but it's enough to make it worth our while to tap them and make syrup. Tapping the trees is always a fun day for our family. The kids enjoy hanging the buckets and watching the spile for any drips of sap.

Caitlin and Addy hanging sap buckets.

Seeds
Mid-February means it's time to plant my pepper seeds. This year, I am using seeds that I saved from our vegetable garden last year. It's my first time using our own seeds and I'm hopeful that they will sprout.  We have one big, south-facing window in our home and I cram it full seed trays to get a head start on the garden.

Seed packets filled with seeds we saved from last year's pepper harvest.

Honey Bees
This spring we have decided to take on a new endeavor.  We are going to add bee hives to our ever-expanding list of hobbies.  I honestly don't know anything about what it takes to raise bees, so I've enrolled in "bee school" with our local bee club. Matt and I have been spending our spare time researching all we can in preparation for our two new hives. I'll be blogging more about this experience if you are interested in learning with me!


Tuesday, October 3, 2017

Pumpkins!


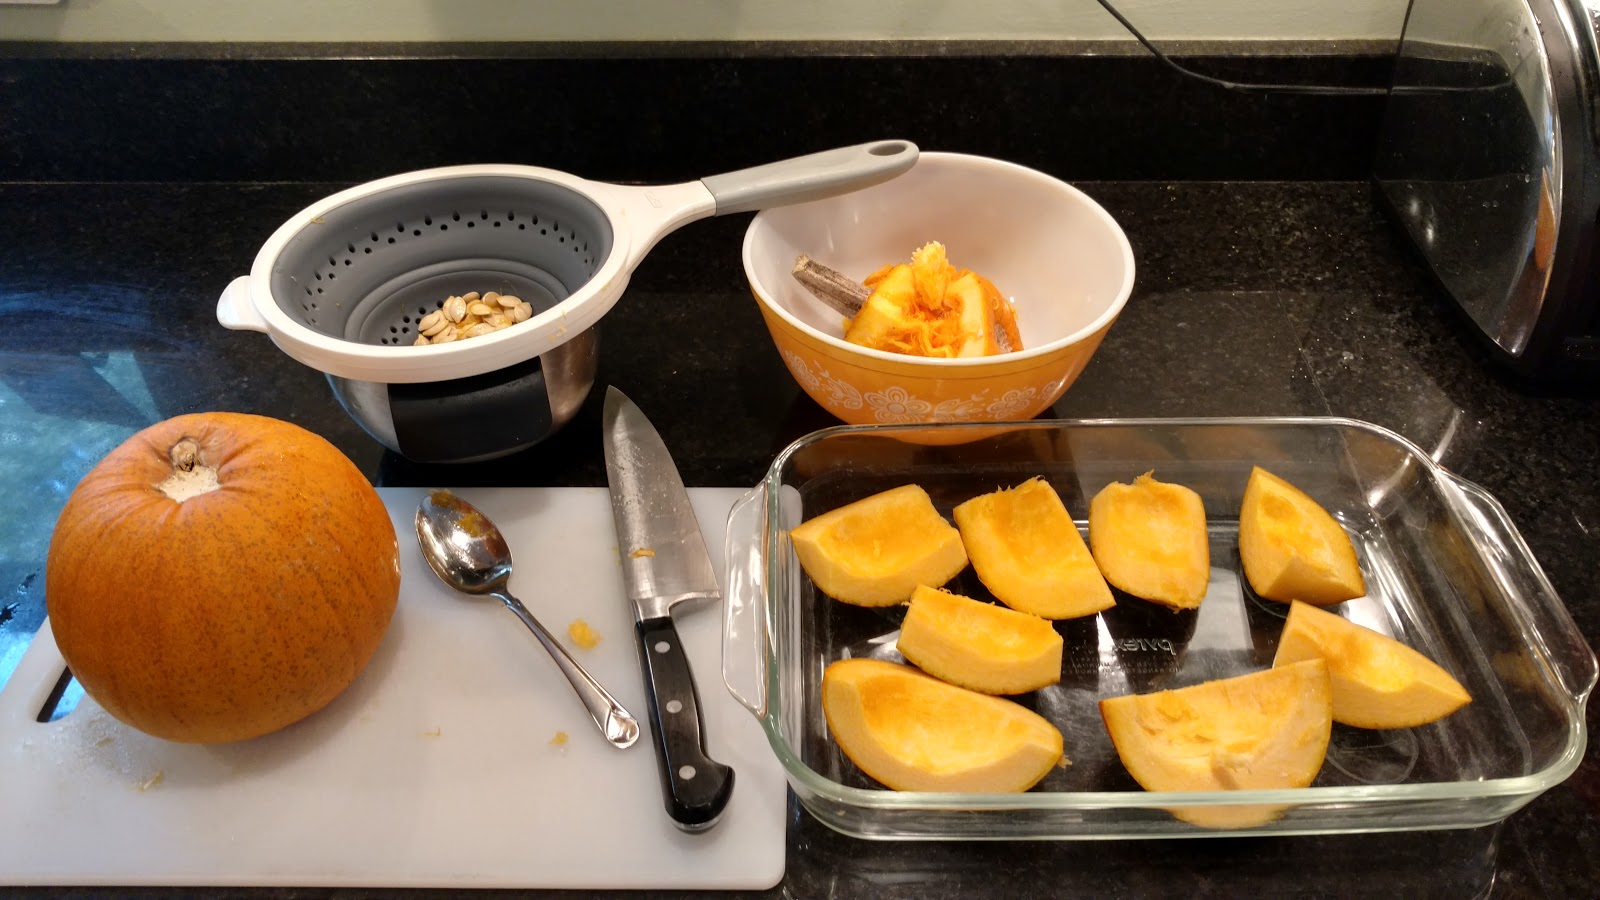
We grew sugar pumpkins in our garden this year. Our plants produced a total of six pumpkins. To be honest, they didn't do very well. We battled downy mildew for most of the summer and eventually, our poor leaves succumbed to the disease. Sadly, the plants died before the pumpkins fully ripened. I left them in the garden for as long as possible. I decided to harvest them once I noticed that our neighborhood chipmunks were eyeing up the garden.

Preparing pumpkins to be roasted.

Despite the fact that they make good decorations, I decided that today would be a good day to preserve them for the winter.

I rough cut each pumpkin into similar-sized pieces. Then I scraped out the insides and separated the seeds. I roasted the pumpkin pieces in the oven for 45 minutes at 350 degrees. Once they were fork-tender, I scraped out the roasted pumpkin and pureed it in the food processor. Lastly, I froze the puree in 2 cup quantities. I will use this later on for a variety of recipes, including pie of course!

The finished product for the freezer.

Now, back to those seeds I separated out. I've really been craving sweet snacks but I'm pretty limited with my choices. So I cleaned up the seeds and dried them lightly with a towel. I had about 1 1/2 cups of seeds. I added 2 Tbsp of maple syrup, 1 Tbsp of melted butter, and 2 tsp of cinnamon. I mixed this all together and spread the seeds out evenly on a foil-lined baking sheet.

Pumpkin seeds mixed with maple syrup, butter, and cinnamon.

Lastly, I sprinkled a tiny bit of salt over the top of the seeds. I baked the seeds until dry and crispy, about 30 minutes at 325 degrees. This experiment was a huge success! The seeds are delicious and fulfilling without being too sweet.

Wednesday, September 27, 2017

Preserving Food - Dehydrating

Fall is hands-down, my favorite time of year. The weather turns colder, the leaves turn brilliant colors, and the garden vegetables are plentiful.

Very plentiful. In fact, I'm spending a good portion of every day preserving food so that none of those veggies go to waste. Honestly, its a job. But it's a job I enjoy and I love knowing that all winter we will continue to enjoy the fruits of our labor!

I've only recently started using my food dehydrator more regularly. To date, most of my efforts have been on canning and freezing. I have found that dehydrated vegetables make a great snack and don't take up much room for storage.

Eggplant are some of my favorites in the dehydrator.

Preserving this beautiful eggplant by drying it out in the dehydrator.
I used the mandolin to cut the eggplant into slices of the same thickness. This ensures that they all dry out evenly. Then I sprinkled the slices with Himalayan Pink Salt. I arranged the slices so that there was plenty of space for the air to circulate around each slice. I let them dry out in the dehydrator for the day. It's an easy method of preserving a vegetable that has grown so plentifully in our garden.

The mandolin allowed each slice to be uniform in thickness.
Yesterday I spent a lot of time picking cherry tomatoes. Many of the tomatoes have started to split open on the vine, which makes them less appealing to eat whole. I thought that dehydrating them might be a good use for these split tomatoes. I painstakingly cutting each one in half and placed them on the tray to dry out in the dehydrator.

Preparing cherry tomatoes for the dehydrator.

It took 11 hours, but the end result were some delicious little tomato snacks that I just can't get enough of!


Every tray of the dehydrator was full of cherry tomatoes.

In the past, I have always stored these dehydrated veggies in a mason jar. I decided to try vacuum sealing them to see if they will have a longer shelf life. In theory, this should work. However, I did notice that the vegetables were so highly compressed in the vacuum bags that I'm not sure whether or not they will maintain their shape. Time will tell!

Nutritious snacks, ready for storage.


Monday, September 25, 2017

Grocery Bill

Let's talk groceries.

This week at the grocery store I planned ahead with a shopping list and only purchased items we really needed for school lunches. Other than the fruit, most of these items will last longer than a week.
A week's worth of groceries from the store.

I spent a total of $43.68 on the items in this picture. Of this, only $22.72 was spent on actual food items! Admittedly, I will also be using some food from our pantry (ie raisins and peanut butter) to round out the school lunches. I find it amazing that I can reduce our overall food budget to such a small number, while still feeding my family healthy meals and snacks. 

In addition to the items purchased from a grocery store, I anticipate spending an additional $18 on 3 gallons of raw milk from our local dairy farmer. I will be using this to make yogurt, butter, and cheese, with one gallon leftover for our girls to drink throughout the week.

Raw milk from a local dairy farm.
Finding a source for local, raw dairy has proven to be a bit challenging. The farm I was using for milk has always been pricey. However, I was only buying one gallon a week so we were okay with the cost. Now that we are trying to make more products with raw farm milk, we need a source that is closer and more cost effective. We are lucky to have found a farmer in our own town who is willing to sell us some of his milk.

I can see lots of room for improvement in our food choices. I plan to work on a homemade version of hummus, which will likely be healthier and cheaper than the store-bought version. We have been working to reduce and eliminate processed meats from our kids' lunchboxes. I'm also hopeful that in the future, our fruit trees will produce more so that we don't need to buy any from the grocery store. As for the nuts, I'm still actively looking for some to forage. In the meantime, I'll have to stick to store-bought cashews and peanuts.

Once these ripen, I won't have to buy grapes from the store!

Summary:
Previous to this challenge, we were spending $175/week, on average, at the grocery store. This total includes non-food items as well. I think this is way too high for a family of 4 that has a garden, eggs, chicken and beef in the freezer. What were we spending our money on!?


Thursday, September 21, 2017

Keeping it Going!

Fall peas getting closer to harvest!
I've had a lot of people ask me if I'm relieved to be done with my one week challenge.  And the simple answer is, no. The truth is, I benefited on so many levels, that it really doesn't make sense to stop.

I have spent the last few days brainstorming ways to continue the challenge while making a few modifications to make it a viable, long-term lifestyle. There were definitely some missing holes in our food supply which would make it hard to do this without a few changes. I'll be working to address those issues along the way, but none of them are short-term fixes. I'm just not prepared to buy a cow!

I'm going to continue blogging about the experience because it helps me keep a clear vision of why we are doing this. I like the accountability, the encouragement, and the helpful suggestions from those who read it. Plus, it will be a fun record for me to review down the road.

So here are some of my thoughts regarding a new challenge going forward.  I'm going to outline the caveats and why I've chosen to make these exceptions. This time around, my husband (Matt) is totally on board too!

The Challenge (redefined!):
We will primarily eat only food that is grown or produced in our own backyard. Just as before, this will include our own organically raised and pasture-fed broiler chickens. We have a steady supply of eggs from our flock of layer hens. Our vegetable garden has been very prolific this year. We have plenty of preserved food as well as fresh produce still to harvest. We are choosing to include our preserved foods that have been processed with store-bought vinegar or sugar. Going forward, we will try to make our own vinegar and find other ways to preserve without sugar. These foods will make up the bulk of our diet.
Our preserved food supply.
Foraged Food
We've also chosen to include foods that we forage. Matt and I have been learning how to forage wild mushrooms. We are also learning more about foraging wild berries, nuts, and plants. It's a lot to learn but it's an exciting avenue to explore. Nature really does provide for our needs if we know where to look.
Winner, winner - Chicken of the Woods for dinner!
Locally Sourced Food
Going forward, we will include foods that are locally sourced. We've chosen to include this caveat for a few reasons.

The first reason being that we already have a freezer full of high quality, 100% grass fed/grass finished beef. It was purchased from a farmer in our own state of New Hampshire. It's an excellent source of meat and we definitely want to include it in our diet.
Galloway Cattle
Additionally, we want to include dairy items for our family. Although Matt and I will choose not to consume much dairy, it's nice to have a healthy option for occasional use. Plus, we think it's important for our daughters to consume high-quality dairy. We choose to purchase raw milk and we will be exploring our options to make our own butter and cheese from this milk. These items are costly to make from our current farm source, so we are looking at ways to make this more cost effective.
We love raw milk!

Miscellaneous
Realistically, we will still need to purchase some food items from a grocery store. However, we are going to limit these purchases to strictly necessary items for our girls. Part of the challenge for us will be to see how little money we can spend at a grocery store.

We are going to conduct this challenge for one month and then re-evaluate at that time to see if we need any further modifications. I won't be blogging about my daily meals. However, I will update with our progress, new things I've learned, or "clean" changes we are making to our household as we grow and progress through the challenge.

Monday, September 18, 2017

Backyard Challenge Summary

A view of our house, garden and fruit trees.

Benefits of the Challenge:

I am very pleased with how well this last week went. My body feels great, my energy levels are fantastic and my mind is clear and focused. In the first few days, I experienced some hunger and loss of energy. But after day 3, my body seemed to adjust and I really wasn't hungry or craving other foods any more. I had no stomach discomfort or headaches, as I sometimes do eating a standard diet. At night, I slept hard and had no trouble getting to sleep. I woke up feeling rested and ready to go.

Weight Loss
I did not do this challenge to loose weight, but it was a nice extra benefit. I weighed myself on the morning of day 1 and then again the morning after the challenge ended. I lost a total of 5 lbs during that time. Keep in mind, I ate a lot of food and did not restrict portion sizes at all. I ate until I felt satiated and allowed myself to snack between meals. Simply changing the type of foods I ate, as opposed to the quantity of food I ate, was enough to bring my body back into balance.

Grocery Savings
An additional benefit to this challenge was having a lower grocery bill! Keep in mind that my family did not fully participate in this challenge. Their meals were greatly comprised of the same components of mine, with slight variation (ex. I added noodles to their chicken soup). Obviously, I spent $0 on my groceries. In total I spent only $40 on food groceries for the rest of the family this past week. This was largely comprised of dairy, deli meat, bread, soda (for my husband), and fruit.

No Trash
I think it's also worth noting that I personally, did not produce any trash or food waste. There was no packaging to recycle, no trash to throw out, and I ate or froze everything I made. If there were scraps left after preparation, such as tomato skins, I gave it to the chickens or added it to our compost pile (ie corn husks).


Overcoming Obstacles:

Fat Source
I went into the challenge knowing that I had some obstacles to overcome.  The first issue was the lack of a fat source for cooking, eating, etc. I found that skimming chicken fat from a cooked chicken mostly worked for my needs.  However, going forward, I would like to render fat during the process of butchering our chickens and use it to make schmaltz. Having schmaltz on hand would give me a more reliable supply for cooking.

Our two chicken tractors for pasture-raised meat birds.

Salad Dressing
While I often eat salads, I was worried during the challenge that I would miss not having a good salad dressing.  I overcame this obstacle by creating a dressing using tart blueberries, strawberries, and a bit of maple syrup. I blended these together and the result was a delicious dressing that was refreshing and simple. One way to make this even better would be to add a splash of vinegar. I don't currently produce this, but I think I could pretty easily by using either grapes or apples from our backyard. We are going to prioritize this project so that we have our own vinegar on hand for cooking, preserving, and flavor.
Ready to make salad dressing.

Starch
Lastly, I identified a lack of starch as a possible issue. I honestly didn't feel that this was missing at all from my diet last week. I don't usually eat grains and I especially try to stay clear of foods with gluten. In a few weeks, we will be harvesting our sweet potatoes.  In the past, we have had a good enough supply to last us through the spring. I planted even more this year so hopefully, we will have a steady supply until next fall.

Our littlest daughter holding our biggest sweet potato from 2016.

Food Choices
Overall, we have a good amount of food diversity on our property. Admittedly, I am a bit tired of eating chicken! I never seem to get tired of eggs but it would have been nice to have another protein source. Without a doubt, I also missed dairy and nuts.

It was hard to watch others around me eating different foods that I might normally enjoy too. Coffee dates, birthday parties, and Sunday family dinners were all tempting but knowing the challenge was only one week made it easier to overcome.

A view of our garden, including the enclosed blueberry patch.
Overall:

Despite the fact that they chose not to participate, my family was very supportive and excited to see me succeed. It was great to see my girls follow along with the challenge and take pride in the food we raise. We love teaching our daughters where our food comes from and how to eat for optimum health.

My husband and I plan to continue this challenge in the future, with a few minor caveats to make it a more sustainable lifestyle for our family. As we continue to learn more about growing, preparing, and finding our own food, we are more excited than ever to continue on this journey. Look for upcoming blog posts to follow our progress toward "growing clean!"
Strawberries are a family-favorite from the garden.

Sunday, September 17, 2017

Challenge Day 7

Looking forward to having those grapes in this harvest basket soon!

Breakfast:
You guessed it, two eggs over-easy.  But my lovely husband also cut up some potatoes for me to saute in chicken fat so that I could have a side dish with my eggs today.

Love these potatoes on the side.

Lunch:
I spent all morning processing more tomatoes for my pantry.  I really didn't feel like preparing a meal so I had leftover chicken soup while I worked.  I also snacked on dehydrated eggplant. Since I was so busy this morning, I wasn't overly hungry and I felt satiated by the small meal.

Snack:
I picked one of the four remaining apples from our young tree today. I have intentionally held off on eating any this week in order to save them as a treat. Since it is day 7, I thought I had held off long enough! I even dipped my apple slices in maple syrup for an extra sweet kick.  It was yummy and well worth the wait!

Only 1 of our 4 young apple trees produced apples this year. 
I savored this one!

Dinner:
We had family over for dinner tonight and my husband spent a good amount of time preparing a really amazing ham. He even made a special glaze for the top.  My sister-in-law brought mashed cauliflower with cheese and bacon and my mother-in-law brought homemade apple sauce.  I will admit that I ate a bite of each (my only "cheat" all week!).  I can assure you, their dinner was awesome. I really felt badly for myself having to stick to plain chicken! I kept it simple again tonight by just reheating some leftover chicken from last night. I also had some corn on the cob as a side. My corn is all ready to be picked and processed, so we are eating our fill now before I freeze the rest.

Lots of corn to eat and process.

Summary:
I'm definitely sick of chicken.  But in every other way, I feel pretty amazing.  I realized today that since Challenge Day 2, I haven't really been hungry.  I feel satiated by my food choices and I'm excited to have found some new ways to eat the same foods.

Tomorrow, I will wrap up the Challenge with some final observations.  Thanks to all of you for following along! The blog has definitely help keep me accountable and gotten me excited for future endeavors too.